

Quick Answer
Quick Fix: Go to Elementor → Tools → Regenerate CSS & Data, then clear all cache (plugin, server, CDN, browser). If you recently changed your domain, run a search-replace in your database to update old URLs. If you uploaded a custom font via Elementor’s Font Manager, delete and re-upload it, then regenerate CSS again. Those three steps fix about 90% of Elementor font-missing issues.
If you opened your site today and the fonts look completely wrong – everything defaulted to Arial or Times New Roman – you are not alone. This is one of the most common Elementor complaints, and it has a clear set of causes and fixes.
This guide covers every root cause, not just the domain-change scenario. Whether you uploaded a custom font, recently moved staging to live, switched your domain to HTTPS, or installed a new plugin – you will find the exact fix here, explained step by step. If you want to completely outsource this hassle and keep your design assets error-free, exploring professional website maintenance services can save your layout from unexpected breaks.
Why Are Elementor Fonts Missing? (Root Causes)

Before jumping into fixes, it helps to understand why fonts disappear in the first place. Elementor generates a CSS file and stores font references in your WordPress database. Anything that breaks the link between that CSS file and the actual font files – whether it is a URL mismatch, a cache serving old code, or a file that was never uploaded correctly – will cause fonts to vanish on the front end. Anything that breaks the link between that CSS file and the actual font files… will cause fonts to vanish on the front end. Staying updated with a proper website maintenance checklist is the best way to prevent these issues.
Here are the seven most common root causes:
1. CSS Not Regenerated
Elementor stores your design settings in the database and writes them out to a CSS file. After certain changes – like switching themes, updating Elementor, or making typography changes – the CSS file can become out of sync. The editor shows the right font, but the front-end is still reading the old file. The editor shows the right font, but the front-end is still reading the old file. When custom typography fails to load, it is often tied to a broader stylesheet generation issue on the server. Make sure to also check our comprehensive walkthrough to fix Elementor CSS problems if your global dynamic styles are still not reflecting live.
2. Domain or URL Change
This is the most widely reported cause. When you migrate a site, change your domain, or move from staging to production, Elementor’s generated CSS still contains hardcoded references to the old domain. Font URLs like http://old-domain.com/wp-content/fonts/… will simply 404 on the new domain.
3. Caching Layers Serving Old Files
Even after you fix the underlying issue, multiple layers of cache can keep serving the broken version. You have your caching plugin (WP Rocket, W3 Total Cache, LiteSpeed Cache), your server-level cache (Nginx FastCGI, Redis, Varnish), your CDN (Cloudflare, BunnyCDN), and your own browser cache – all of which may hold stale copies of your CSS. …all of which may hold stale copies of your CSS. If you’re noticing this loading lag specifically on phones, check out our guide on why is mobile website speed slower than desktop platforms.
4. Custom Font Not Properly Uploaded
Elementor Pro’s Font Manager lets you upload custom font files (.woff2, .woff, .ttf, .eot). If the upload was incomplete, if the font files were deleted from your server, or if you migrated without transferring the wp-content/uploads/elementor/fonts/ folder, the custom fonts simply will not load.
5. Plugin or Theme Conflict
Some optimization or security plugins strip or defer stylesheets, which can prevent Elementor’s font CSS from loading correctly. Similarly, some themes enqueue their own font stack that overrides Elementor’s choices. A recently installed plugin is a very common culprit when fonts break suddenly without any site migration. A recently installed plugin is a very common culprit when fonts break suddenly without any site migration. When building an seo friendly website design, you must configure optimization modules carefully to avoid asset conflicts.
6. CORS / CDN Blocking Font Files
If you serve font files from a CDN subdomain or a separate asset domain, browsers enforce Cross-Origin Resource Sharing (CORS) rules. Without the correct Access-Control-Allow-Origin header on your font files, browsers silently refuse to load them. The fonts are there – the browser just will not use them.
7. Mixed Content (HTTP vs HTTPS)
After enabling SSL on your site, any font request that still uses http:// gets flagged as mixed content and blocked by modern browsers. This often happens with hardcoded font URLs in custom HTML widgets, theme files, or header/footer code. This often happens with hardcoded font URLs in custom HTML widgets, theme files, or if you manually attempt to change the link color in wordpress templates using insecure absolute paths.
Root Cause vs Fix: Quick Reference Table
Root Cause | Symptom | Fix | Difficulty |
Domain change | Fallback font shows | Search-replace DB + regen CSS | Medium |
Plugin conflict | Font loads in editor only | Disable plugins one by one | Easy |
Caching issue | Random pages affected | Purge all cache layers | Easy |
CORS / CDN block | Console shows blocked request | Add CORS headers / whitelist | Medium |
Mixed content (HTTP) | Network tab shows ‘blocked:mixed-content’ | Force HTTPS, update URLs | Medium |
Custom font not uploaded | Font missing for all visitors | Re-upload via Font Manager | Easy |
CSS regeneration needed | Editor shows font, frontend doesn’t | Elementor → Tools → Regen CSS | Easy |
Step-by-Step Fix 1: Regenerate Elementor CSS & Data

This is always step one, regardless of what caused the issue. Regenerating CSS rewrites Elementor’s generated stylesheet from scratch, using the current settings in your database.
- Log in to your WordPress dashboard.
- In the left sidebar, go to Elementor → Tools.
- Click the Regenerate CSS & Data button and wait for the confirmation message.
- Next, go to Elementor → Settings → Advanced.
- Under CSS Print Method, choose External File (this is preferred for performance and caching). If you already have it set to External File and fonts are still missing, temporarily switch to Internal Embedding to test.
- Under Load Google Fonts, make sure it is set to Yes if you are using Google Fonts. Set it to No only if you plan to host fonts locally.
- Save changes and then clear all your caches before testing.
Note:
If fonts reappear after regenerating CSS but disappear again after a day or two, the issue is almost certainly caching. Check your CDN’s TTL settings.If fonts reappear after regenerating CSS but disappear again after a day or two, the issue is almost certainly caching. Routine audits ensure that your website maintenance keeps your site fast and functional without data drops.
Step-by-Step Fix 2: After a Domain or URL Change
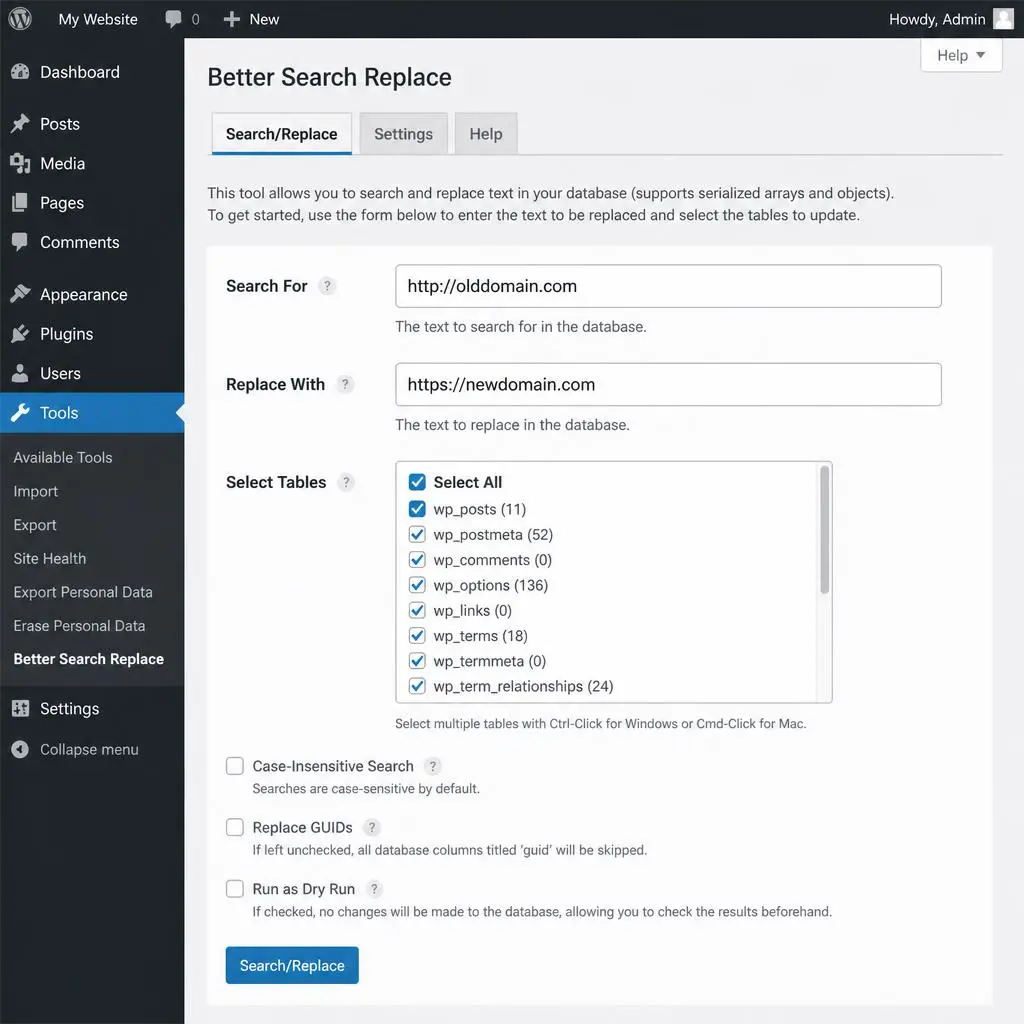
When you change domains, Elementor’s database still contains references to the old domain. You need to replace every occurrence of the old domain with the new one across your entire WordPress database.
Note:
Always take a full database backup before doing a search-replace. A tool like UpdraftPlus or a phpMyAdmin export takes two minutes and can save hours of work.
Option A – WP-CLI (Recommended for Developers)
WP-CLI is the fastest and most reliable method. Run these commands from your site’s root directory via SSH:
bash
wp search-replace ‘http://old-domain.com’ ‘https://new-domain.com’ –all-tables –precise –report
wp search-replace ‘https://old-domain.com’ ‘https://new-domain.com’ –all-tables –precise –report
Run both commands – the first handles non-SSL references, the second catches any already-HTTPS references that still use the old domain name. The –precise flag handles serialized data correctly, which is important because Elementor stores settings in serialized PHP arrays.
After the search-replace, run Elementor → Tools → Regenerate CSS & Data again, then clear all caches.
Option B – Plugin-Based Search & Replace
If you do not have SSH access, use a plugin. Better Search Replace (free) or WP Migrate are both reliable. Here is how:
- Install and activate Better Search Replace from the WordPress plugin directory.
- Go to Tools → Better Search Replace.
- In the Search For field, enter your old domain (e.g., http://old-domain.com).
- In the Replace With field, enter your new domain (e.g., https://new-domain.com).
- Select all tables, check Run as dry run? first to preview changes, then uncheck it and run for real.
- Repeat with https://old-domain.com if your old site had SSL.
- Regenerate Elementor CSS and clear all caches.
Step-by-Step Fix 3: Custom Fonts Uploaded via Elementor Font Manager

If you uploaded a custom font using Elementor Pro’s Font Manager and it is not showing up, the problem is usually that the font files are missing from the server, the upload was incomplete, or the CSS was not regenerated after the upload.
- Go to Elementor → Custom Fonts (in the WordPress sidebar).
- Find your font. Check whether the font files (especially .woff2 format) are properly listed.
- Click Edit on the font. Delete the existing font files and re-upload them. Always include at least the .woff2 format. Adding .woff as a fallback is good practice.
- Save the font entry.
- Go to Elementor → Tools → Regenerate CSS & Data.
- Clear all caches and test on the front end.
The font files should be stored at wp-content/uploads/elementor/fonts/ on your server. If you recently migrated your site, confirm this folder was transferred – it is often excluded from migrations that only copy theme files. …it is often excluded from migrations that only copy theme files. Managing files accurately during upgrades is a major part of the website maintenance vs redesign framework.
Step-by-Step Fix 4: Clear Every Cache Layer

Even when the underlying problem is fixed, stale cache is the reason fonts do not appear. You need to clear every cache layer, not just your caching plugin:
- Caching Plugin Cache: In WP Rocket, click Clear Cache. In LiteSpeed Cache, go to LSCache → Purge All. In W3 Total Cache, go to Performance → Purge All Caches.
- Elementor CSS Cache: Elementor → Tools → Regenerate CSS & Data (this also counts as clearing Elementor’s own cache).
- Server-Level Cache: If your host uses Nginx FastCGI cache, Varnish, or Redis object caching, purge from your hosting control panel. Some hosts (like Kinsta or WP Engine) have a one-click purge button.
- CDN Cache: In Cloudflare, go to Caching → Configuration → Purge Everything. For other CDNs, find the Purge or Invalidate option in your dashboard.
- Browser Cache: Do a hard reload – Ctrl+Shift+R on Windows/Linux, Cmd+Shift+R on Mac. Or open an Incognito/Private window to test without any cached files. Browser Cache: Do a hard reload… Or open an Incognito window. To streamline this performance tuning, follow a comprehensive website speed optimization checklist.
Step-by-Step Fix 5: Fix CORS Issues for Self-Hosted Fonts

If you host font files on a CDN domain or subdomain that is different from your main WordPress domain, you must add CORS headers so browsers can load them.
For Apache servers – add to your .htaccess file:
apache
<FilesMatch “\.(ttf|ttc|otf|eot|woff|woff2)$”>
<IfModule mod_headers.c>
Header set Access-Control-Allow-Origin “*”
</IfModule>
</FilesMatch>
For Nginx servers – add to your server block config:
nginx
location ~* \.(ttf|otf|eot|woff|woff2)$ {
add_header Access-Control-Allow-Origin *;
}
After adding these rules, reload your web server and clear your CDN cache.
Step-by-Step Fix 6: Force HTTPS for All Font Requests
After enabling SSL, any font loaded over plain HTTP is blocked by browsers as mixed content. Here is how to confirm this is your problem and fix it:
- Open your site in Chrome and press F12 to open DevTools.
- Click the Console tab and look for errors that say: “Mixed Content: The page was loaded over HTTPS, but requested an insecure resource…”
- If you see this error for font files, you need to update those URLs to HTTPS.
Go to WordPress Settings → General and confirm both WordPress Address and Site Address start with https://. Then run the WP-CLI or Better Search Replace process described in Fix 2 to replace any remaining http:// references with https://.
If you use a plugin like Really Simple SSL, it handles most of this automatically, but you may still need to check custom HTML widgets and hardcoded theme files.
Step-by-Step Fix 7: Find and Kill the Plugin Conflict
If fonts worked fine before you installed a new plugin, that plugin is almost certainly the cause. Here is a clean way to identify it:
- Switch to a default WordPress theme like Twenty Twenty-Four. If fonts appear, your theme is the conflict.
- If the theme is not the issue, go to Plugins → Installed Plugins and deactivate all plugins except Elementor.
- Check the front end. If fonts appear now, a plugin was causing the conflict.
- Reactivate plugins one at a time, checking after each one, until fonts break again. That is your conflict plugin.
- Once identified, check that plugin’s settings for options like Optimize CSS Delivery, Defer Stylesheets, or Combine CSS Files. Disabling those options usually resolves the conflict.
The most common offending plugins are Autoptimize, WP Rocket (CSS optimization settings), NitroPack, and certain security plugins that block external font requests. The most common offending plugins are Autoptimize, WP Rocket, NitroPack… This debugging workflow mirrors the maintenance process developers follow when migrating properties between wordpress vs webflow.
Advanced: Host Google Fonts Locally (Permanent Solution)

If you are tired of recurring Google Fonts issues – especially after domain changes or CDN misconfigurations – hosting fonts locally is the most robust long-term solution. It also eliminates external HTTP requests, which improves both privacy (GDPR) and performance.
- Go to Google Webfonts Helper (gwf.tyrando.de) and find your font family.
- Select the weights and styles you actually use (e.g., 400 regular and 600 semibold only).
- Download the zip file and extract it. You will get .woff2 and .woff files.
- Upload the files to your server – a good location is /wp-content/themes/your-theme/fonts/ or /wp-content/uploads/fonts/.
- Copy the @font-face CSS code from Google Webfonts Helper and add it to your theme’s style.css or a custom CSS file. Update the file paths to match where you uploaded the files.
- In Elementor → Settings → Advanced, set Load Google Fonts to No to stop Elementor from also loading them from Google’s servers.
- Regenerate Elementor CSS and clear all caches.
The main trade-off: you will need to manually update font files if the font design changes on Google Fonts. For most business sites, this is a non-issue since font designs rarely change. For most business sites, this is a non-issue since font designs rarely change. Local asset configuration is a prime example of why website maintenance is important for asset control.
How to Use Browser DevTools to Diagnose Font Problems

Before trying every fix blindly, spend two minutes in DevTools to identify exactly what is happening. This saves a lot of time.
Check the Network tab for font requests:
- Open DevTools (F12) and go to the Network tab.
- Type font in the filter bar to show only font-related requests.
- Reload the page (keep DevTools open – tick Disable cache while DevTools is open).
- Look at the Status column: 200 means loaded successfully. 404 means file not found. 403 means access denied. A CORS error shows as blocked or a red entry.
Check the Console tab for warnings:
- Mixed content warnings look like: “The page was loaded over HTTPS, but requested an insecure resource http://…”
- CORS errors look like: “Access to font at ‘X’ from origin ‘Y’ has been blocked by CORS policy”
- A font loading silently with a 200 status but not rendering usually means another CSS rule is overriding Elementor’s font stack.
Pro Tips to Prevent Elementor Font Issues in the Future
- Before any migration: Export and note down all custom font names used in your site. After migrating, verify them in Elementor → Custom Fonts.
- Always include the elementor/fonts/ folder in your migration: Most migration plugins move wp-content/uploads/ by default, but double-check. Elementor Pro font files live there.
- Use preconnect hints for Google Fonts: Adding <link rel=’preconnect’ href=’https://fonts.googleapis.com’> to your <head> reduces load time by establishing the connection early.
- Only load the weights you actually use: Every extra weight is an extra HTTP request. Stick to 400 and 600–700 for most sites.
- Test on a staging site before going live: Any major Elementor update or plugin change should be tested on staging first. Many font issues stem from updates made directly on production.
- Document your font choices: Keep a simple note listing which Google Fonts or custom fonts your site uses, with the weights. When something breaks after an update, you will know exactly what to look for. Test on a staging site before going live: Any major Elementor update or plugin change should be tested on staging first. Keeping an eye on how often should you update your website keeps your production build secure.
FAQs – Elementor Custom Fonts Missing
1. Why are my Elementor fonts showing correctly in the editor but not on the front end?
This is almost always a CSS regeneration issue. The Elementor editor previews fonts live from your settings, but the front end reads from a generated CSS file that may be out of date. Go to Elementor → Tools → Regenerate CSS & Data, then clear your caching plugin and browser cache.
2. I changed my domain and now all fonts are broken. What is the fastest fix?
Run a WP-CLI search-replace to update the old domain to your new domain across all database tables. Then regenerate Elementor CSS and purge all cache layers. If you do not have WP-CLI access, use the Better Search Replace plugin. The full process is covered in Fix 2 above.
3. My custom font was working fine and just stopped showing up after an update. Why?
Updates to Elementor or your WordPress theme sometimes trigger a CSS cache conflict or reset certain settings. Start by regenerating CSS and clearing all caches. If that does not work, check Elementor → Custom Fonts to confirm your font files are still there – occasionally an update or server cleanup can delete uploaded files from the uploads directory.
4. Should I host Google Fonts locally or keep loading them from Google’s servers?
Hosting locally gives you more control, slightly better performance (no external DNS lookup), and GDPR compliance (no user IP sent to Google). The trade-off is that you need to manage font file updates manually. For most business websites, local hosting is the better long-term choice. For simple blogs where you want zero maintenance, Google CDN is fine.
5. Does Elementor Free support custom font uploads, or do I need Elementor Pro?
The custom Font Manager – which allows you to upload .woff2, .woff, .ttf, and .eot files – is an Elementor Pro feature. With Elementor Free, you can only use Google Fonts or system fonts. If you need to use a brand-specific or licensed font, you will need Elementor Pro or enqueue the font manually through your theme’s functions.php file.
6. My fonts are showing 404 errors in DevTools. What does that mean?
A 404 error means the browser found the font URL in the CSS but could not locate the actual file at that address. This typically means either the file does not exist on the server (incomplete upload or failed migration), or the URL in the CSS is wrong (outdated domain or incorrect file path). Check whether the font file actually exists on your server using your hosting’s file manager, and verify the URL matches its actual location.
7. I cleared all caches but fonts are still broken in Chrome. Why?
Chrome has an aggressive internal cache separate from your website’s cache. To truly bypass it, open Chrome DevTools (F12), go to the Network tab, tick the Disable cache checkbox, and reload the page while DevTools is still open. Alternatively, test in an Incognito window, which uses no cached files at all. If fonts appear in Incognito but not in your regular browser, it is a browser cache issue.
8. Can a security plugin cause fonts to stop loading in Elementor?
Yes. Security plugins that implement strict Content Security Policy (CSP) headers can block external font requests from Google Fonts or other third-party domains. If you suspect this, check your security plugin’s CSP settings and whitelist fonts.googleapis.com and fonts.gstatic.com. You can confirm a CSP block by looking at the Console tab in DevTools for a message referencing “Content Security Policy.”
Final Thought:
Elementor font issues almost always come down to one of three things: a stale CSS file, a URL mismatch in the database, or a cache that has not been cleared. Work through the steps in order – regenerate CSS first, fix URLs second, clear every cache layer third – and you will resolve the issue in most cases without needing any paid tools or developer help. Need professional developer assistance to optimize your layout architecture? Visit our official Rydesk Home Page, explore our tailored Web Design and Development Services, or connect with our engineering branch through our Contact Us Panel today. If you want a permanent fix or professional setup, check out our Technical WordPress Optimization Services